From the Editor... Turning Dreams into Reality
In the News
Return of the Far Fur Country Project Update
Another Inuktitut Word for Snow
A Condo for Dogs: The Evolution of Our Dog Houses
Antiquity of the Inuit Sled Dog Supported by Recent Ancient DNA Studies
A Different Type of Sledding
Astrup’s Harness: A personal voyage to understand an old sealskin sled dog harness, Part 2
Movie Review: The Stories of Tuktu: Tuktu and His Eskimo Dogs
IMHO.... Why do we do this?
Navigating This Site
Index of articles by subject
Index of back issues by volume number
Search The Fan Hitch
Articles to download and print
Ordering Ken MacRury's Thesis
Our comprehensive list of resources
Defining the Inuit Dog
Talk to The Fan Hitch
The Fan Hitch home page
Editor: Sue Hamilton
Webmaster: Mark Hamilton
The Fan Hitch,
Journal of the Inuit Sled Dog, is
published four times a
year. It is available at no cost online
at: https://thefanhitch.org.
The Fan Hitch welcomes your letters, stories, comments and suggestions. The editorial staff reserves the right to edit submissions used for publication.
Contents of The Fan Hitch are protected by international copyright laws. No photo, drawing or text may be reproduced in any form without written consent. Webmasters please note: written consent is necessary before linking this site to yours! Please forward requests to Sue Hamilton, 55 Town Line Rd., Harwinton, Connecticut 06791, USA or mail@thefanhitch.org.
This site is dedicated to the Inuit Dog as well as related Inuit culture and traditions. It is also home to The Fan Hitch, Journal of the Inuit Sled Dog.
 On a late winter afternoon, retired boss dog Henson (r) relaxes with his girlfriend, Piqatik (l). The condo’s design affords just enough respite from howling winds or heavy rain without obstructing a good view. Photo: Hamilton A Condo for Dogs: the Evolution of Our Dog Houses by Mark Hamilton |
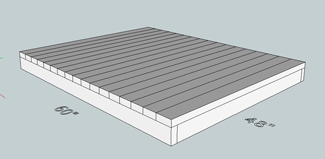
Those two doghouses then served as the catalyst for continuing thoughts and discussions about our general doghouse needs. The picture at the top of this page is of our latest design. We’ve built a couple of these houses at this point and we really like them. It sleeps two dogs in individual areas and also supplies them with a covered deck. The decking (floor) is made of 2” x 4”s lying on their sides, spaced by 10p nails. The decking is a robust surface which offers drainage for any water or snow that the dogs or wind brings in. Our dogs seem to really like this design. Here’s how it’s made:
Cutting diagrams
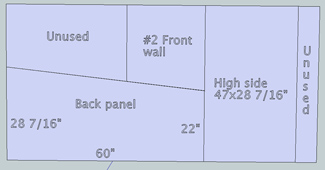
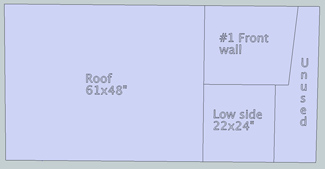
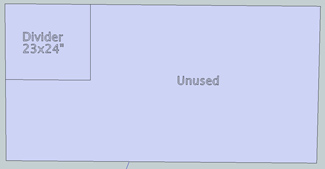
First, you don't actually need to start with full 4’ x 8’ sheets of plywood if you have enough smaller pieces of ½” plywood to make up the individual pieces. All panel dimensions are based upon the use of ½” plywood. If you are using 4’ x 8' sheets of plywood you can reduce the number to just two if you have a small piece of plywood large enough to make a single 23” x 26" panel. This “divider” is shown in cutting pattern #3. Finally, a few of the plywood panels in the diagrams are missing their dimensional information, however those dimensions are provided in the following narrative.
The base (deck)
It is made from untreated 2” x 4”s. Your yield will be best from 8' lengths. Space the decking boards with 10p nails (for drainage). The deck is best nailed together.
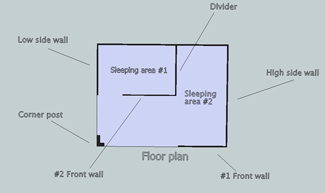
The floor plan
Since I’ve assigned names to the panels, and some of those names don’t indicate a physical location, I figured I owed you an illustration to identify where each went. All the plywood panels attach to the deck or to each other with cleats (I use furring strips) and for this part of the assembly I like to use screws. It makes replacement simpler in case a panel is damaged. Deck screws or sheetrock screws work but deck screws are better.
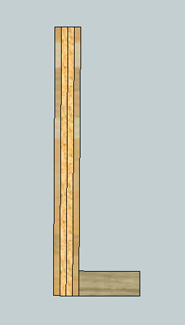
Here’s a detailed illustration on attaching panels with cleats.
Missing dimensions
I didn't put numbers in for the #1 Front and #2 Front. Fear not, they are identical to the first 4' (starting at the 28-7/16" end) of the back panel. Both #1 Front and #2 Front are 24" wide. #1 Front is 28-7/16" high on one side and 26" high on the other, #2 Front is 26" high on one side and 23-5/16" on the other.
Furring strips
If you don't have them you can use a table saw to rip 1” x 2"s out of 2” x 4”s or 2” x 6”s.
Putting it all together
When I assemble this house I attach furring strips at the bottom edge of each wall panel first. Then I attach the back wall and the two ends to the base. I cut furring strips to length for the inside corners of the walls so that the walls are stable. I then install #1 Front, and finally #2 Front and the Divider panel. All wall panels are joined to their adjacent walls with furring strips (corner blocking).
Try to keep wall structure “square” as you will have only limited ability to square up the structure when you attach the roof.
Install cleats all around the top inside surfaces of the walls, lay the roof panel in place and screw it down. The roof is 1" longer than the house. This is intended as a drip-edge on the low end of the roof. Align one of the corners of the roof panel with the wall panels on the 28-7/16" high end first and install a screw to secure it. Then align the other corner of the roof panel with the walls on the 28-7/16" high end and secure it with a screw. On the low side of the roof, if the house is out of square you need to apply sufficient force to the roof panel to bring it into alignment with the back wall of the doghouse. Then put screws every 4" or so around the perimeter. This is the panel where you don't want to miss a cleat and every screw you drive should be left securely in place where you put it (even if you missed) to limit water intrusion.
Next take a couple of short sections of 2” x 4” to make the corner post. Measure in place to match the pitch of the roof and attach securely at the roof and deck. On the front of the house there is an unsupported section of roof between the end of #1 Front and the corner post. The roof will be stronger and less likely to warp if you attach a section of 1” x 1” or 1” x 2” to the underside of the roof panel in this area.
Precaution
This house is HEAVY! You may want to consider building the doghouse in place.
Questions?
Email me at mhamilton02@snet.net.