From the Editor: Fed Up!
IsumaTV’s First Annual Online Film Festival
Paving over Cultural Identity
Retracing Twenty-Five Year Old Foot and Paw Steps
Okpik’s Dream Update
Bannock – On the Frozen Sea, in the Woods or at Home
Media Review: Romance of the Far Fur Country
Media Review: On the Trail of the Far Fur Country
IMHO: Truth, History and Dogs
Navigating This Site
Index of articles by subject
Index of back issues by volume number
Search The Fan Hitch
Articles to download and print
Ordering Ken MacRury's Thesis
Our comprehensive list of resources
Defining the Inuit Dog
Talk to The Fan Hitch
The Fan Hitch home page
Editor: Sue Hamilton
Webmaster: Mark Hamilton
The Fan Hitch, Journal
of the Inuit Sled Dog, is published four
times a year. It is available at no cost
online at: https://thefanhitch.org.
The Fan Hitch welcomes your letters, stories, comments and suggestions. The editorial staff reserves the right to edit submissions used for publication.
Contents of The Fan Hitch are protected by international copyright laws. No photo, drawing or text may be reproduced in any form without written consent. Webmasters please note: written consent is necessary before linking this site to yours! Please forward requests to Sue Hamilton, 55 Town Line Rd., Harwinton, Connecticut 06791, USA or mail@thefanhitch.org.
This site is dedicated to the Inuit Dog as well as related Inuit culture and traditions. It is also home to The Fan Hitch, Journal of the Inuit Sled Dog.
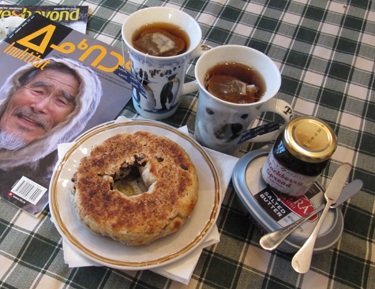
Comfort food for breakfast or any time Photo: Hamilton
Bannock – On the Frozen Sea, in the Woods or at Home
by Sue Hamilton
Back in January 1999 The Fan Hitch introduced readers to bannock, the ubiquitous polar trail food. The bread’s roots in North America trace back centuries to Scotland and was likely brought to the arctic by traders, whalers and explorers. Historically there have been many variations attributed to ingredients: regionality, seasonality, cooking techniques and ethnicity. Many variations of bannock still exist.
For folks who spend a lot of time in the bush, bannock could be considered a food staple, goes with anything and everything or is eaten by itself. Best enjoyed freshly prepared (in this writer’s opinion), simple straight-forward recipes and preparation techniques work well, especially in a tent with the wind howling outside. But even prepared in advance and “thoroughly chilled” (aka frozen as solid as granite) by the elements it can be still appreciated after a long day on the trail – once the dogs have been picketed and cared for and camp has been set up – dunked in a hot mug up of tea or thawed in a bowl of steaming caribou stew.
Nearly ten years after the first bannock recipes appeared in The Fan Hitch, a few more were published in 2008. They were variations on one quite simple and uncomplicated tried and true recipe that has served well in our household, especially after acquiring a #3 cast iron skillet with a well-fitted lid. (Previous attempts using Revere Ware stainless steel skillets were such dismal failures even our parrot wouldn’t eat any.)
Recently I came across another bannock recipe. This one was not quite as simply elegant as the 2008 recipes, but it implied a sense of history, which unfortunately I could not track down or verify. But I was intrigued and had to try it. Trapper’s Sourdough Bannock was published in the Gunflint Lodge Cookbook by Ron Berg and Sue Kerfoot (University of Minnesota Press; ISBN-10: 0816628319 1997; 192 pages).
For the uninitiated, sourdough is not an ingredient that you just go to your kitchen cabinet to measure out. Kept refrigerated, it is a living “breathing” life form, another mouth to feed as it gets hungry on a regular basis, about once a week or so. If you’re curious, you can Google search to find all about its multi-millennial history. Sourdough is often associated with Alaska gold seekers who were also known as “sourdoughs” because to keep this precious commodity from freezing, they kept their cherished sourdough starters in a pouch close to the warmth of their bodies. It’s not that freezing kills the hungry yeast and lactobacillus bacteria that give the breads with which they are made their characteristic tang. It’s just that frozen starter must first be thawed and its living inhabitants resuscitated at a warmer temperature, thus making its use a tad more time consuming to begin with. If you don’t mind taking on another mouth to feed, go to the venerable King Arthur Flour (Norwich, Vermont, USA) website for a very thorough primer on sourdough. There you can learn how to make your own starter or you can buy King Arthur’s historic starter that has been passaged and handed down since the 1700s! Or if you have a friend who keeps starter, you can “adopt” a half-cup or so to get you going. I once dried, froze and then vacuum sealed a portion and shipped it to Norway where, after a week or so of intensive care, it was revived and put into service, where it lives happily to this day.
Although this recipe is not as spontaneous/spur-of-the-moment convenient as variations without sourdough, it sure is worth the extra involvement. You have to be mindful of the amount of starter you will need and be sure you have “bulked up” your supply with extra generous feedings. That’s usually an overnight thing. And this recipe calls for an hour’s rise in a warmish place before the cooking begins.
Here’s the recipe as it appears in the Gunflint Lodge Cookbook:
Trapper’s Sourdough Bannock
1 cup flour
½ teaspoon salt
1 tablespoon sugar
¼ teaspoon baking soda
1½ cups sourdough starter
In a medium bowl, combine dry ingredients. In a large bowl, measure out sourdough starter. Sprinkle dry mixture over sourdough. Mix together only enough to moisten dry ingredients. Turn out on to a well-floured surface; knead gently about 10 to 15 times to make a soft but still sticky dough.
Pat biscuit dough into a flat cake about ½ to ¾ inch thick on a floured surface. With your fingers, work a hole in the center of the dough much like a giant doughnut. This helps the bannock to cook more evenly and will make more of the marvelous crust. Warm a cast-iron skillet or other heavy-bottomed frying pan over the campfire or cook stove. Don’t get it too hot! Grease the bottom and sides of the pan with some bacon grease or whatever oil or shortening is on hand. Place the bannock in the pan, patting it gently into place. Grease the top of the bannock and set the skillet in a warm place. Let it rise for one hour.
Place the skillet over low coals and cook until bottom of the bannock is nicely browned. Be careful! There is a fine line between browned and burned. Now flip the bannock over and finish cooking. You can also prop the pan up in front of a low fire and bake until the top is brown and the bannock is done. Break off a steaming hunk and slather it with butter and some homemade wild berry jam if you have it.
Some observations:
• A tender texture (one in which the gluten is not over developed by heavy mixing and kneading) yields better results, but depending on the viscosity of your starter, it might take some extra effort to moisten all the dry ingredients. Be sure not to over-moisten by adding a bit too much water lest the finish product be too “doughy” inside.
• If you’re cooking on an electric stove as I do, a medium setting works.
• Timing (using a medium setting on an electric stove): 10-12 minutes on the first side and perhaps as much as 6-7 minutes on the second side.
• A half-recipe with ¼ cup of raisins yields a 9-10 ounce bannock.
• If you’re cooking for two, the full recipe will yield leftovers. While leftover bannock is not nearly as good as crackling crusty fresh-out-of-the-pan, a creative and resourceful friend in Oregon suggests turning the remains into French toast. Even this would be do-able on the trail as frozen out-of-the shell raw eggs are relatively safe and easy to transport and thaw. Mix with (reconstituted powdered) milk and a dash of vanilla and soak sliced bannock until saturated, then fry up. Yummm!
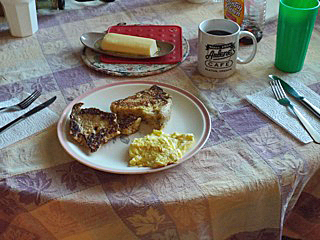
Bannock to French toast conversion Photo: Senter
• It’s good to match size of the skillet to the size of the recipe. That way the sides of the dough are supported during the one-hour rise and are in contact with the skillet during cooking. A number 8 cast iron skillet (10-5/8 inches across the top, 8-7/8 inches across the bottom) works for a full recipe while a number 3 (6½ inches across the top, 5¼ inches across the bottom) is perfect for a half recipe.
• Once you’ve tried the recipe as is, you can “mess” with it by substituting a portion of white whole wheat flour for the plain flour, add raisins, currants, dried cranberries, cinnamon….
According to Alexandra Conover, who provided the bannock recipe appearing in the September 2008 issue of The Fan Hitch, this Trapper’s Sourdough Bannock is known to her as a “flummie” (a name of Labrador origin) because it has that hole in the middle. And that’s why covering the pan at any time during the cooking (although during the rising isn’t a bad idea) isn’t necessary. This doesn’t sound like much but if you’ve ever tried to find a number 3 cast iron skillet of any origin with a well-fitted lid, let alone one for less than $400USD (highly prized by collectors!), you might find another reason to favor this sourdough version of bannock…or flummie. Small cast iron skillets without lids are plentiful and cheap, at least at flea markets or on eBay.
With a hole or without? No cast iron pan? No camp stove? No problem, at least for bush travelers below the tree line! At the November 2014 Snow Walkers’ Rendezvous registered Maine Guide and Jack Mountain Wilderness Living Instructor, Paul Sveum, described various bannock making techniques including a very simple ingredient list, a measuring cup and measuring spoon, a bowl, a wood fire, a sharp knife and a green stick!
Paul Sveum’s Bannock-on-a-Stick
1 cup flour
½ cup water
1 tablespoon oil (optional; yields a more cake-like texture)
1 teaspoon baking powder
1 teaspoon salt
Ultimately you can use whatever bannock recipe you like the best, the important thing is the consistency. Here are my directions for bannock on a stick:
This recipe is for a simple bread, nothing fancy. That said, just like a blank canvas, this recipe can be elaborated on to no end. I have seen this recipe make garlic basil bread sticks, cinnamon raisin rolls, chili bowls, and of course the ever popular ash cake. Really, any bread is just a vehicle for getting other food into ya. So master this simple recipe and then let loose with your culinary creativity.
1. Start by mixing the flour and salt together (and any other dry ingredients if you are adding to the recipe). In camp (or at home) this is best in a large stainless steel bowl, but on trail you can use a cook pot, fry pan or even a plastic bag. I have heard tell of camp cooks taking a 50 pound sack of flour, pouring in enough water in the bag to make the dough and mixing the batch up. I have never had the nerve to try it though, sounds like a recipe for 50 pounds of mold. Anyway, mix your dry ingredients thoroughly.
2. I like to dissolve the baking powder in a little warm water before adding it to the liquid ingredients, here the oil and water. Again, this is where you would add other liquid ingredients if you are elaborating on the recipe.

3. Mix the wet into the dry ingredients slowly, mixing as you go. The reason I mix slowly together is that I am looking for a certain consistency, Play-Doh-esque. Once the wet and dry ingredients are mixed you should have a stiff dough.
4. Take ½ cup of dough and dust it in flour so it doesn't stick to your hands. Then roll it between your hands like you are making a Play-Doh snake, a long tube about thumb thickness.
5. Find, make and debark a stick to cook the bread on. I prefer a green stick because a dead stick is likely to catch fire while the bread is cooking. Of course, I would stay away from wood like pine with a strong odor and taste. A good neutral wood like alder or maple works fine. The stick should be about an inch diameter and 3-4 feet long. Debark and smooth the last two feet of the stick. This is where the dough will be wrapped. Also, you can carve a point into the other end that will help you anchor the stick in the ground while the bannock is cooking,
6. Begin the wrap by making full turn of the dough around the stick and stick the end to the rest of the dough. This will help secure the end. Continue spiral wrapping the dough around the stick until you get to the end of the dough. Finish the dough by making one full turn at the end of the dough like you did at the other end.
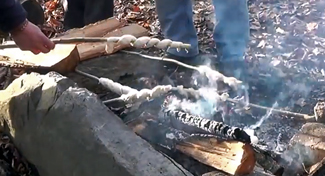
Thank you, Mother Nature, for the heat and the cooking utensil!
Courtesy of Derek Faria
7. There are many ways of cooking the bread at this point, but the easiest is to drive the stick’s pointy end into the ground a few feet back from the fire. Placing a log or stone under the stick will help support it and keep it from sagging into the fire. Monitor the bread as it cooks, rotate if it is getting brown and keep a good bed of coals going, remember, fire is like your stove top and coals are like your oven.
8. Bread is done when you can poke a small stick into the bread and it comes out dry.
You can watch Paul’s twenty-four minute bannock workshop here.
Ed: Please remember, DO NOT share any leftover bannock containing raisins or currants with your dogs. Raisins and currents are nephro (kidney) toxic to dogs.