In This Issue....
From
the
Editor: Good Deeds, Great and Small
Fan MailIn the News
Sledge Dog Memorial Fund Update
BAS Vignette: Sledging with Dogs
CAAT Northern Project 2008 Plans
Navigating This
Site
Index of articles by subject
Index
of back issues by volume number
Search The
Fan Hitch
Articles
to download and print
Ordering
Ken MacRury's Thesis
Our
comprehensive list of resources
Talk
to The
Fan Hitch
The Fan
Hitch home page
ISDI
home page
Editor's/Publisher's Statement
Editor: Sue Hamilton
Webmaster: Mark Hamilton
The
Fan Hitch, Journal of the Inuit Sled
Dog, is published four times a year. It is
available at no cost online at:
https://thefanhitch.org.
The Fan Hitch welcomes your letters, stories, comments and suggestions. The editorial staff reserves the right to edit submissions used for publication.
Contents of The Fan Hitch are protected by international copyright laws. No photo, drawing or text may be reproduced in any form without written consent. Webmasters please note: written consent is necessary before linking this site to yours! Please forward requests to Sue Hamilton, 55 Town Line Rd., Harwinton, Connecticut 06791, USA or mail@thefanhitch.org.
This site is dedicated to the Inuit Dog as well as related Inuit culture and traditions. It is also home to The Fan Hitch, Journal of the Inuit Sled Dog.
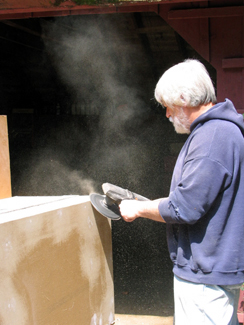
If gas mileage is important to you, put a radius
on all edges. photo: Hamilton
Building a Dog Box, Part
2:
Construction and Finishing
by Mark Hamilton
Construction and Finishing
by Mark Hamilton
Almost all of the screws in this dog box pass through the plywood and into the framing, which puts those screw heads on the exterior surfaces of the dog box. I countersunk the screws and later filled over them. While there are many commercial wood fillers available, I chose to use Bondo®, an automotive product. Like the high performance wood fillers, Bondo® is a two part polyester material that adheres well to wood and is very dimensionally stable. Don't use Bondo® on any area where structural filler is required or where there will be a stained finish; but under a painted finish it works very well. Here’s another tip, for use when you're working with polyester resins (whether as a filler, a surface coating or with glass cloth) and you don't get the ratio of resin to catalyst just right due to special conditions like high humidity or low temperatures. I'm told that if you're patient and just leave it alone the resin will eventually cure. I've also been told that putting the slow curing resin out in direct sunlight will help it to cure. But, for the rest of us, here's a faster option - apply what is referred to as a "hot coat" directly on top of the slow curing resin. A hot coat is just another batch of resin mixed with a greater than normal amount of catalyst. Caution: be careful not to add so much catalyst to the resin that you don't have enough time to spread it over all the material that is curing too slowly.
Somehow, putting doors into the door holes seems like a finishing detail to me. Maybe it's because, to my mind, the dog box is already built. I took extra time when I cut the door holes into the side panels to label each of the cut out pieces (door panels) so that I knew where each panel came from, which side was up, and which side was the outside surface. That way I knew where each door panel fit best.
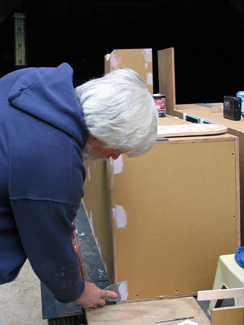
Bondo® is also a good wood filler for projects
with a painted finish. photo: Hamilton
I didn't want rain sheeting down the side of the dog box and into the boxes, so I attached a weather flange made from 0.25 in. (0.6 cm.) luan plywood around the inside of the each of the door openings. An added benefit is that the weather flange gives each door a positive stop in the closed position. The flanges were glued and screwed in place, and then the seams were caulked. I also made drip caps for over the doors out of a little extra spruce. They, too, were installed with glue and screws, followed by a thin bead of caulk.
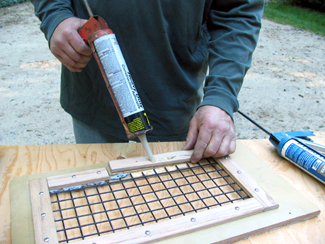
PL400 adhesive and screws hold the oak retainers in place on
the door. Grate bedded in acrylic caulk. photo: Hamilton
I had taken our most previous dog box to an auto body shop and had it painted to match our truck. It looked really nice, but I found the automotive paint to be difficult to deal with for the touchups required during multiple seasons of use. This time I decided to use what many wooden boat builders are now using, latex acrylic primer and exterior house paint. If that comes as a surprise to you, you can go here to read an article on the subject. The author is a retired chemical engineer. My choice was to use high gloss paint as they have the toughest surface finish, but semi-gloss does a better job hiding surface imperfections and it’s almost as durable as the high gloss paint.
I used the same brand and type of paint for both the interior and the exterior surfaces although I chose to use a much lighter color on the interior. Before painting the interior I caulked every joint between the framing and the plywood panels to try to prevent the moisture that gets inside the boxes from having easy access to soaking into the wood. With my fingertip I smoothed the caulk into a nice fillet over these seams to eliminate the possibility of water puddling around the caulk.
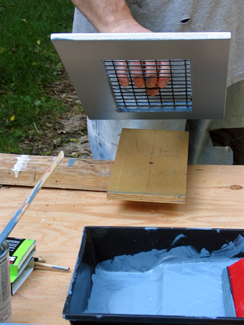
Paint front side, lift door off the fixture and turn
door over. Now paint reverse side and all edges.
photo: Hamilton
Eleven years ago when I built our previous dog box, I used stainless steel piano hinges and galvanized latches on the doors. These materials cost more at the time, but over the years they proved to be worth it by eliminating maintenance or replacement costs. I used the same hinges and latches from the old dog box on the new one I built this fall. Now I think I'm in the area where those hinges and latches have saved us money.
Once the designing, building and finishing processes are done, the dog box needs to be mounted onto the vehicle. The method of attachment will be dependent upon the dog box, the vehicle and your preferences. But I think a word about mounting hardware is in order here. Your dogs are going in those boxes, and we all want our dogs to be safe and secure. I refuse to use ungraded bolts to attach my dog box to my truck. Grade 7 (five lines, evenly spaced around the bolt head) and Grade 8 (six lines on the bolt head) are made from medium carbon steel that has been quenched and tempered. They have high tensile strength (resistance to breaking from force applied along the length of the bolt shaft). Grade 5 bolts (three lines, evenly spaced around the bolt head) are also made from medium carbon steel that has been quenched and tempered. They have somewhat lower tensile strength, but greater shear strength (resistance to breaking along the cross-section of the bolt shaft).
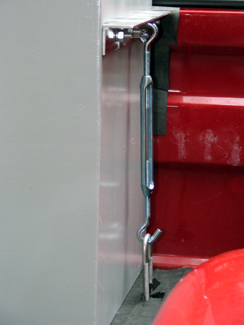
Rail boxes bolt to alum. angle on the bed box
and to the bed rails. Turnbuckles and u-bolts
secure the bed box. photo: Hamilton
Postscript
It occurs to me that some of you may be wondering what my experience has been with this dog box. Do I like it? Would I do it again? What would I change?
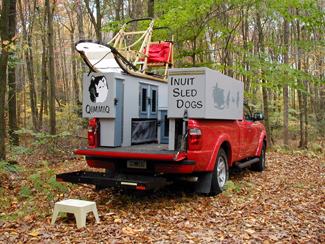
First off, kudos to Alex Murphy of MaineMade Dogsleds! This is a stunningly good design for a dog box. Every time I load or unload dogs, I'm struck by what a civilized way this is to carry sled dogs. They walk up into the back of the truck on a leash and step up into their box. Unloading is the same process in reverse and that takes a lot of strain off my back.
Loading and unloading the sleds are much the same. I never have to lift higher than chest high, and at the same time I have one or both runners on the box sliding along, taking the weight off me. That's wonderful too.
I can't tell you how much I enjoy reaching into the closet for the hanging harnesses or the tuglines lying in their plastic container. Having the other supplies organized and available from the shelves in the cabinet (instead of digging wildly through a tack box where everything was piled on top of everything else) is a joy. If I were to build another dog box I wouldn't consider any other design. I would just try to do a better job with my carpentry.
If I wanted to carry more dogs, on a full size truck, I'd just rotate the individual compartments in the rail boxes 90º and build the bed box to the height of the bed rails. Then I could have two compartments in the bed box and five dogs per side in the rail boxes. Or I could have four dogs per side in the rail boxes and a good-sized closet on the back of one rail box and big cabinet on the other. Or I could put the closet and cabinet together on the back of one rail box and a fifth dog compartment into the other rail box (Alex's configuration). So this design, on a full size truck, can be adapted to carry as many as twelve ISDs. That's more of them than I’m ever going to be carrying, but maybe that number works for you. If so, why not give Alex's design a try, then email him a picture when it's done so he can enjoy it too.
Let it snow, let it snow, let it snow! photo: Hamilton
Resources
Free CAD/3D Modeling Programs
Google Sketchup 3D, PC or Mac
CadStd Lite 2D, PC only
Waterproof Construction Adhesives
Liquid Nails
Titebond III & IV
PL400
Stainless Steel Hinges and Fasteners
Fore and Aft Marine Supply - pretty good prices on stainless steel fasteners or hinges if local supply isn't available.
Speciality Lumber Supplier
Boulter Plywood - do you need something special, like plywood that will bend around a 12 in. (30.5 cm.) radius?
How To Information
Make a scarf joint jig - for those times when you need something bigger than 4'x8' plywood.
Using latex paint for exterior projects
Got a tip you'd like to share? Email it to mail@thefanhitch.org or snail-mail it to Mark Hamilton, 55 Town Line Road, Harwinton, CT 06791, USA.