Table of Contents
*
Fan Mail
*
Breaking Away: The Liberation of Ove Nygaard
*
What is the ISDI and the ISD?
*
A Holiday Miracle
*
Of Sheep and Sled Dogs
*
News Briefs
*
Qamutiit and How They're Loaded
*
The Truth Behind the Madrid Protocol
*
Media Review: Globe Trekker - Iceland and Greenland
*
Product Review: Ryobi TrimmerPlus®
*
Tip for the Trail: Bitches in Season
*
IMHO: Super Cars and Inuit Dogs
Navigating This
Site
Index of articles by subject
Index
of back issues by volume number
Search The
Fan Hitch
Articles
to download and print
Ordering
Ken MacRury's Thesis
Our
comprehensive list of resources
Talk
to The
Fan Hitch
The Fan
Hitch home page
ISDI
home page
Editor: Sue Hamilton
Webmaster: Mark Hamilton
Contents of The Fan Hitch Website and its publications are protected by international copyright laws. No photo, drawing or text may be reproduced in any form without written consent. Webmasters please note: written consent is necessary before linking this site to yours! Please forward requests to Sue Hamilton, 55 Town Line Rd., Harwinton, Connecticut 06791, USA or mail@thefanhitch.org
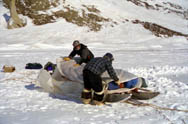
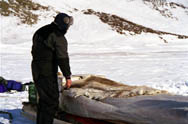
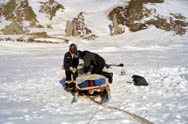
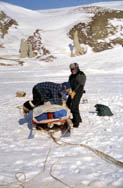
by Sue Hamilton
Despite its simple design, the qamutiq (singular of qamutiit) is quite a piece of engineering. Consider the creativity of the original versions that contained no wooden parts. Those had animal bone lashed together with thin strips of hide for the structural elements, and runners made of frozen fish laid end-to-end and wrapped in hides. The bottoms of runners were thick layers of mud and moss with a finishing made smooth with urine and a lot of "elbow grease". Keeping that contact surface as smooth and as frictionless as possible was extremely labor intensive and it didn't take much to destroy all the hard work.
Today's qamutiit vary in length and can be as long as eighteen feet. They have runners made of two by six or two by eight dimensional lumber (although the one's in these photos are made of aluminum) and have wooden cross pieces that are still lashed together for the flexibility that prevents them from self-destructing over rough ice. Some qamutiit, especially those used in Greenland have what we might refer to as a "driver's bow" at the back. But even with that feature, there is barely any runner extending out enough to stand on. The runner's "shoes" are made from the same type of "poly" that you see on many brush sleds, only this stuff is a lot thicker, so thick that extra pieces are carved into the crescent shaped toggles and other fittings used to attach the long bearded seal skin traces to the end of the harnesses and the other end of the traces to the qamutiq's "bridle".
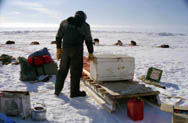
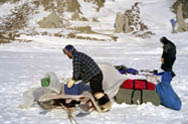
Loading a qamutiq is a well organized activity. It cannot be done haphazardly, if it is going to secure the contents and offer some semblance of comfort for extra passengers for long-term travel. Presented here is a pictoral lesson of how to load a qamutiq in ten easy steps.
Step 1

Step 2
Step 3
Step 4
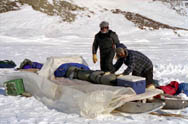
Step 5
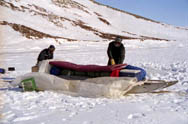
Step 6
Step 7
Step 8
Step 9
Step 10
