Editorial: We’ve Moved!
Historic Ceremony in Kangiqsualujjuaq
Passages: Heiko Wittenborn
In the News
Point of View: Veterinary Service in Nunavik
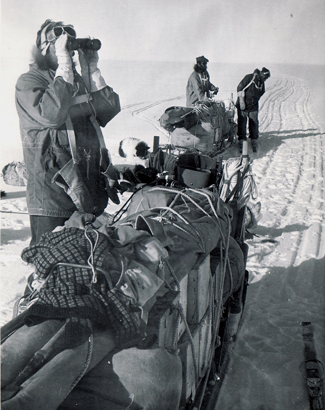
Chinook Project: Summer 2011 Report
Unikkausivut: Sharing Our Stories
Making a Mitten Harness
Media Review: Martha of the North (video)
IMHO: Historical Perspective or Hyperbole
Index: Volume 13, The Fan Hitch
Navigating This Site
Index of articles by subject
Index of back issues by volume number
Search The Fan Hitch
Articles to download and print
Ordering Ken MacRury's Thesis
Our comprehensive list of resources
Defining the Inuit Dog
Talk to The Fan Hitch
The Fan Hitch home page
ISDI home page
Editor's/Publisher's Statement
Editor: Sue Hamilton
Webmaster: Mark Hamilton
The Fan Hitch, Journal of
the Inuit Sled Dog, is published four times
a year. It is available at no cost online
at: https://thefanhitch.org.
The Fan Hitch welcomes your letters, stories, comments and suggestions. The editorial staff reserves the right to edit submissions used for publication.
Contents of The Fan Hitch are protected by international copyright laws. No photo, drawing or text may be reproduced in any form without written consent. Webmasters please note: written consent is necessary before linking this site to yours! Please forward requests to Sue Hamilton, 55 Town Line Rd., Harwinton, Connecticut 06791, USA or mail@thefanhitch.org.
This site is dedicated to the Inuit Dog as well as related Inuit culture and traditions. It is also home to The Fan Hitch, Journal of the Inuit Sled Dog.
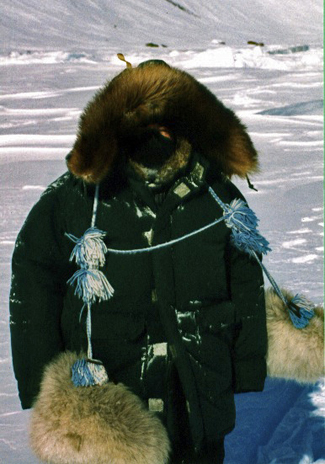
Photo: Hamilton
Make a Mitten Harness
by Sue Hamilton
Very early on during our
visits to arctic Canada we learned that having mittens
blown off a moving qamutiq while taking photographs was a
big ooops. It was one thing to give a shout out to a snow
machine’s driver - assuming your screams could be
heard over the roar of the engine – to stop and retrieve
the only protection between your hands and frostbite. But
when behind a team of hard working and eager Inuit Dogs,
it is a little disconcerting to ask the team to stop and
hope they will stay that way until you trudge back to
retrieve your handwear then return to the qamutiq and get
securely settled down before the dogs jump to their feet
and take off again. It’s even harder in either case if the
mittens are on the wrong side of a lead!
When I was a kid, my Mom made me wear something I remember being identified as "idiot mittens". It was a simple affair – a piece of string or yarn ran up one jacket sleeve, across the back of the shoulders and down the other, and a mitten was tied to each end. I never understood the "idiot" part. Was my mother referring to the wearer or to the design? Later in life, I did figure out that the moniker was a pretty much universal one, although I continued to ponder the answer to my question.
Retired British Antarctic Survey doggy man
and artist Mike Skidmore (foreground) wears
a mitten harness made of lampwick.
Photo: courtesy Mike Skidmore
The mitten harness is a functional step beyond what I wore as a child. The version used by many of the early South Pole explorers was a strictly utilitarian design. But all the ones we have seen on many trips North have been as decorative as they are functional. Two of the major differences between them and the ones of my youth are 1) the polar version is worn entirely on the outside of the parka and 2) the yarn is long enough so that the mittens, when tossed off the hands, can be flipped behind the back and the yarn crossed to keep the mitts out of the way, which can be useful for different tasks.
Apparently many northerners know how to make mitten harnesses but this "idiot" had to go looking for some printed instructions. Luckily, thanks to sympathetic friends, I was directed to Linda MacPhee, one of Canada's foremost sewing experts. Along with her husband Harris, she is co-founder of the MacPhee Workshop, one of Canada's largest design houses and pattern manufacturers. Linda has very kindly given me permission to reproduce in The Fan Hitch her instructions which appear in her booklet Pattern #902 Making Mittens, available to purchase through her website. Thank you, Linda!!! So here in her own words, in time for the cold season (at least in parts of the northern hemisphere) and as a holiday gift suggestion, which is timely for any place on our planet, is Linda MacPhee's "Harness your mittens":
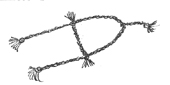 Many Inuit people make a
colorful four-strand braid harness for their
mittens. Worn over a parka, the harness allows
the mittens to hang freely in a position where
they may easily be retrieved when needed. The
mittens are attached by a leather Many Inuit people make a
colorful four-strand braid harness for their
mittens. Worn over a parka, the harness allows
the mittens to hang freely in a position where
they may easily be retrieved when needed. The
mittens are attached by a leather thong embedded in the thumbside mitten seam
around the lower tassels. The cross-bar slides
for easy on-off. The top tassel hangs
decoratively below the parka hood in the back.
thong embedded in the thumbside mitten seam
around the lower tassels. The cross-bar slides
for easy on-off. The top tassel hangs
decoratively below the parka hood in the back.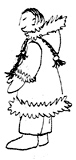 Braiding the
harness is easy with two people. It can be a
fun rainy day project with your child. Cut
four double strands of heavy yarn (such as rug
wool) 1½ times the Braiding the
harness is easy with two people. It can be a
fun rainy day project with your child. Cut
four double strands of heavy yarn (such as rug
wool) 1½ times the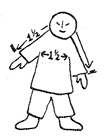 measurement from the left wrist, around the
back of the neck to the right wrist. For
cross-bar, cut four double strands 1½ times
chest measurement. For decorative rear tassel,
cut four double strands the length of the
distance from the back of the neck to peak of
hood.
measurement from the left wrist, around the
back of the neck to the right wrist. For
cross-bar, cut four double strands 1½ times
chest measurement. For decorative rear tassel,
cut four double strands the length of the
distance from the back of the neck to peak of
hood.Tie double strands of main string to a point above your head 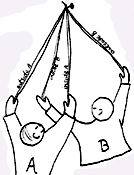 (curtain
rod, picture hook, nail, etc.). Now for the
fun! Two people grasp ends as shown. "A"
crosses his strands, changing hands, outside
strand over inside strand in back of "B's"
inside strand. "B" then crosses his strands,
outside over inside in back of "A's" inside
strand. In a few passes you will see your four
strand braid. Mistakes will show up in the
form of a twisted cord rather than a braid. (curtain
rod, picture hook, nail, etc.). Now for the
fun! Two people grasp ends as shown. "A"
crosses his strands, changing hands, outside
strand over inside strand in back of "B's"
inside strand. "B" then crosses his strands,
outside over inside in back of "A's" inside
strand. In a few passes you will see your four
strand braid. Mistakes will show up in the
form of a twisted cord rather than a braid.Make large tassels by wrapping a book or cardboard several 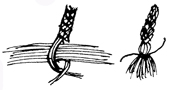 times with
yarn. Cut on one side (a 10 inch/25cm length
is good). Tie ends of braid strands tightly
over mid-point of yarn bundle. Then fold
bundle in half, wrap tightly and tie with a
single strand to form tassel. times with
yarn. Cut on one side (a 10 inch/25cm length
is good). Tie ends of braid strands tightly
over mid-point of yarn bundle. Then fold
bundle in half, wrap tightly and tie with a
single strand to form tassel.Braid cross-bar. Make two more tassel bundles. Holding 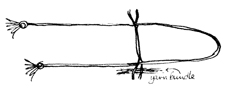 cross-bar
yarn ends over main string, tie ends tightly
over main string and yarn bundle. Finish
tassel ends as before. The bar will slide
easily on the main string. cross-bar
yarn ends over main string, tie ends tightly
over main string and yarn bundle. Finish
tassel ends as before. The bar will slide
easily on the main string.To braid decorative tassel, fold strands 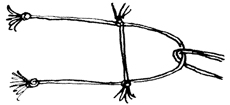 in half over middle of main
string. Braid and finish with tassel. in half over middle of main
string. Braid and finish with tassel. |