In This Issue....
From the Editor:
Unfinished Business
FIDO: Leevan Etok
Fan MailIn the News
Happy Tenth Anniversary, ISDI
Sledge Dog Memorial Fund Update
Inuit Dog Research Project Underway
The Canadian Animal Assistance Team
The Chinook Project Goes to Cambridge Bay
Hints and Tips: Building a Dog Box, Pt. 1
Navigating This
Site
Index of articles by subject
Index
of back issues by volume number
Search The
Fan Hitch
Articles
to download and print
Ordering
Ken MacRury's Thesis
Our
comprehensive list of resources
Talk
to The
Fan Hitch
The Fan
Hitch home page
ISDI
home page
Editor's/Publisher's Statement
Editor: Sue Hamilton
Webmaster: Mark Hamilton
The
Fan Hitch, Journal of the Inuit Sled
Dog, is published four times a year. It is
available at no cost online at:
https://thefanhitch.org.
The Fan Hitch welcomes your letters, stories, comments and suggestions. The editorial staff reserves the right to edit submissions used for publication.
Contents of The Fan Hitch are protected by international copyright laws. No photo, drawing or text may be reproduced in any form without written consent. Webmasters please note: written consent is necessary before linking this site to yours! Please forward requests to Sue Hamilton, 55 Town Line Rd., Harwinton, Connecticut 06791, USA or mail@thefanhitch.org.
This site is dedicated to the Inuit Dog as well as related Inuit culture and traditions. It is also home to The Fan Hitch, Journal of the Inuit Sled Dog.
Building a Dog
Box, Part 1
by Mark Hamilton
by Mark Hamilton
Design
Recently it became time to once again build a new dog box. My anticipation was that I'd be building another variation of the same slant sided, four compartments per side design I've been using since our very first dog box (1977). However, after Sue and I talked about it at length and created a list of "must have" features, it became apparent that a slant side design would not fulfill our needs.
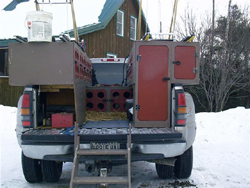 |
Photo: Murphy
It
was about that time that a picture of a friend's (Alex
Murphy, owner of
MaineMade Dog
Sleds)
dog box arrived by email and, after looking at it for a
while, it
seemed to me that a variation of that design could satisfy
all the
items on "our list". The more I thought about it the more it
seemed
like it should work. Sue and I had several more discussions,
plus an
early morning telephone conversation with Alex. It was
during that
conversation that I happily informed him of my plan for a
wholesale
rip-off of his design. Then it was time to get down to
modeling the new
design.If you are interested in doing some 3D modeling on your computer, and your budget (or conscience) prefers you not purchase a product like AutoCAD, Google SketchUp 6 is a full-featured design program, free for download. It saves files in its own special file format. If you want or need a version that will save files in the more common CAD formats, SketchUp Pro 6 can be purchased for $495.
SketchUp has a short learning curve. It did not take long for me to move from drawing rectangles to creating 3D shapes that I could rotate in all directions, as well as change my vantage point from right up close to way far away, all to take the project from the verbal stage to something we could actually see. The next picture is the 3D image of our new dog box, created and displayed in SketchUp 6. From this image I developed a materials and supplies list as well as a cutting diagram.
 |
Photo: Hamilton
Materials and SuppliesFor most do-it-yourselfers, dog boxes are built of wood. They're either mostly wood or all wood. Typically we turn to plywood for making the large panels or all the panels. There are options in the plywood we select. Plywood is identified with an alphabetical code. The first two letters, A-D, grade the facing and back side surfaces of plywood. A is a relatively blemish free and well sanded surface, while D generally has the maximum allowed number of blemishes and a rough, unsanded surface. There are also different types of glues used in making plywood. We need exterior glue, so look for an X after the two letters identifying surface quality.
Marine plywood is identified as AA. It is rather expensive. MDO (medium density overlay) has a reputation for being manufactured almost as carefully as marine plywood. MDO is also referred to as signboard and it has a sheet of kraft paper as the final lamination on one or both sides. MDO is already weatherproof as it is delivered and it costs less than marine plywood, yet a lot more expensive than "naked" plywood.
If you are looking for pre-finished plywood there is a ¾" version that comes with white Filon® laminated on one side which is used in the truck box building industry. It's also made in oversize pieces, which frees you from the design restrictions of the 4'x8' dimensions of the typical sheet of plywood. You could probably buy as much as you needed at a shop that specializes in repairing commercial truck bodies. The downsides to this product are that it is heavy (to estimate the weight of a 4'x8' sheet of softwood plywood, figure on 11 lb. per 1/8" of thickness) and it is expensive.
You need framing material for the construction of a dog box. It's not enough to just butt joint plywood and screw through one panel and into the end grain of the other. Spruce is strong as soft woods go. You can purchase kiln dried 2"x4" or 2"x6" spruce and rip it down into 1"x2"s on a table saw.
Gluing up every joint is a good way to add durability to a dog box, as long as the glue holds. It's important to use glue that is actually waterproof, not just water-resistant. Check out the construction adhesives. I'm using PL400, but there are many products you can choose from.
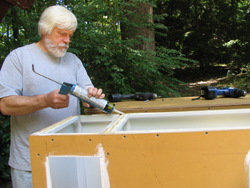 |
Photo: Hamilton
As
far as making strong joints goes, there is nothing like
redundancy. If
you are using glue you will need to clamp or otherwise
mechanically
fasten the joint until the glue sets (which could be upwards
of
twenty-four hours). Screws are easy to use, hold better than
nails and,
if you countersink their heads, need never be removed.
Just
don't
use sheetrock screws. No matter what you do, they are going
to rust.
Stainless steel screws or coated decking screws won't rust.
Coated
screws cost less than stainless steel.Construction – First, Make Parts
With the accurate dimensional information created from the 3D model of the new dog box, I was able to develop a cutting pattern diagram for the plywood panels. This allowed me to maximize the parts yield from each sheet of plywood and minimize the number of sheets of MDO I had to buy.
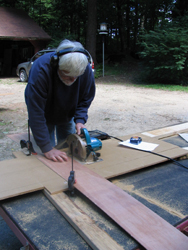 |
Photo: Hamilton
I
transferred the cutting pattern information to the MDO and
cut out all
the pieces with a circular saw. To keep those long, straight
cuts
straight I used the selvage edge of an 8' long scrap of luan
mahogany
as a cutting guide.Construction – Second, Assemble the Parts
Once all the plywood panels were cut out, I started assembling the dog box. I know there are builders/woodworkers who can make the framing pieces before starting to assemble, but I can't. I cut each piece to fit as I get to it; I need to do it this way.
At this point it's mostly just a case of aligning the plywood panels correctly, applying glue to the appropriate sides of the framing piece, and using enough screws to hold it all together. Some of the screws are installed through the plywood and into the framing. For these I drill a pilot hole and countersink so that the screw head will be below the surface of the plywood. Later the countersink holes will be filled and sanded smooth before painting. Screws that are installed through the framing and into the plywood only need to have a pilot hole drilled through the spruce framing to reduce the possibility of splitting.
A large, flat building surface is appropriate at this point in the project. With the use of ladders and low scaffolding you could actually build the dog box in place on your truck, but such a solution is best left for legs and joints younger than my own. I could have built an outdoor worktable for this project, but everything I build or buy has to be stored at some point or another. Instead I am doing the construction on the bed of a small utility trailer, which allows me to push the project into the garage to keep it out of the weather when needed.
Now that all the big pieces of plywood have been cut down into smaller parts, there isn't a lot of heavy lifting involved in the construction process. Like assembling a big jigsaw puzzle, you're just putting each part into its proper location. Unlike a jigsaw puzzle, when I cut the parts out, I labeled every one of them so that later I wouldn't have to figure out where they went in the puzzle.
We prefer for our dogs to be able to see each other when they are in the dog box. We use side panels from old dog crates to make internal dividers between the boxes. Cutting a dog crate panel down to size is quickly and neatly accomplished by use of a 4.5" angle grinder with a metal cutting wheel installed in it.
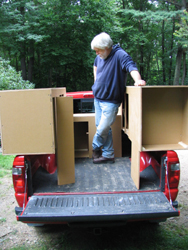 |
Photo: Hamilton
In
the second part of this article we'll be talking a bit about
doors,
hardware, interior and exterior finishing and I'll be
supplying you
with a resource list of manufacturers and various products
useful in
the construction of a dog box.Got a tip you'd like to share? Email it to mail@thefanhitch.org or snail-mail it to Mark Hamilton, 55 Town Line Road, Harwinton, CT 06791, USA.